4.25.2024

#pfcreateandconnect - Class 6 w/Jennifer McGuire

Hello again, Friends!

I'm back again with more PFS products, in the final class from the February event.  This class taught by Jennifer McGuire, is something nearly all of us has done before -- sit and watch as she creates, demonstrating techniques, showing helpful hints and creating fun cards.

Card #1

This is the Berry & Blossoms all-in-one stamp, that I spoke of last class.  It was used as a background, colored with the stencils and left as a whole panel.  The frame popped up over shaker bits with the sentiment lifted with foam inside the shaker.  Jennifer had us do the sentiment this way, eliminating any struggle of attaching the sentiment to the clear acetate, which was sandwiched between two layers of the frame -- both brilliant!  Just make sure to powder the sides of the foam on the sentiment before adding your shaker bits (or better yet, before sticking it down)...

Card #2 - 


Her second card was a technique that she's shown before, and loved -- I believe she called it a buckle card.  The flowers, greenery, sentiment and inner "frame" were all attached only to the left front, while the frame was attached only to the right front, allowing them to fold (or buckle) closed together.
See below...


Well now that you've endured through my event, I want to thank you!  There was a lot of work and information, but it was wonderful!  Hope I didn't string this out and bore you all, but goodness, it's a blessing I didn't share it all in one post!!!

   PFS - Berry & Blossoms stamp, stencil; Notched Corner dies; Stitched Octagonal coverplate; and assorted beads, sequins and bits

Thank you, thank you, thank you for mustering through this but as you can guess, I was a first-timer and SUPER pleased with the classes, comraderie while crafting and cards!
Thanks, Pinkfresh Studios, for the amazing products and event!

Hugs,
TK


4.20.2024

#pfcreateandconnect - Class 5 w/Heather Hoffman

 Welcome!

Another "show & tell" of the Febrary PFS event, with cards inspired by Heather Hoffman!  Believe it or not, the stamp involved with these two cards is one large rubber stamp that can be used as a whole for a background or die cut into individual pieces and used separately -- I love this versatility, as the die is all one piece in the exact layout of the large stamp.  Heather Hoffman has just the gentlest spirit, in my humble opinion!

Card 1 -

This beauty has the pierced background die, the middle frame cut in champagne glitter cardstock, and the florals heat embossed in gold.  The florals were blended using the matching stencils.

Card #2 -

This one was stamped, ink blended with the stencils and then die cut and placed over the frame.  The frame was merely the detail portion of the frame debossed into the panel and nothing actually cut.  I love the versatility of having the frame a standard frame or the detail portion added for more beauty.  There are four sizes, than can be used so they can be either notched corner panels or notched corner frames.  If you caught the recent PFS Live with Tina Smith, she actually used it in a different way making an even wider, double-detailed frame!

PFS - Berry Blossom stamp, stencils; Notched Corner die, Stitched Octagonal coverplate and clear iridescent gems

Again, thank you for spending some time with me, allowing me to share some cards that I am absolutely thrilled with!  Have a great week!

Hugs,
TK


4.18.2024

A Tulip or Two

Good Day, Dear Friends!

I have a couple of cards today, from "makes" while back at Michele's.  She gently instructed me how to better watercolor.  While I would never profess to be an artist, I think I do better with Copics than watercolors, so she encouraged me along.  Starting with these beautiful blooms, it was much easier with her help ~

Card #1


The colored tulips were die cut, placed on a vellum label, then perched upon two accenting strips (one slice of the cherished Subtle e/f, all loaded onto the deep purple base.  I added a few glacier jewels to finish it off.  No sentiment?  Well, I'm not sure what the purpose of the card will be at this time but it stands well on its own, don't you think?

Card #2


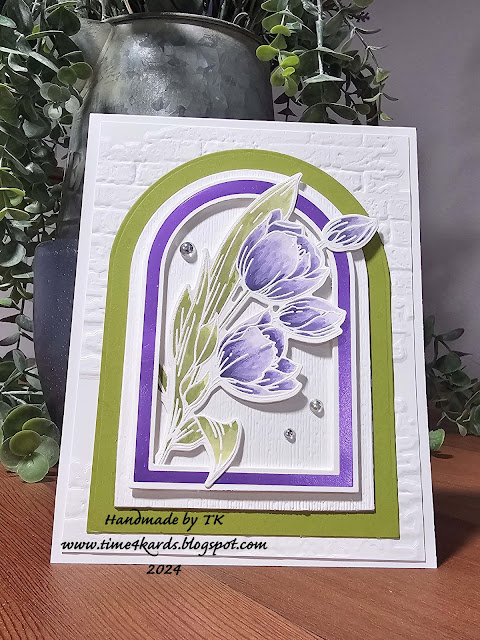
There's quite a few layers in this card!  These tulips were tucked inside the foiled, popped up frame, perched upon a "subtle" embossed panel, laid upon a green panel, backed by the brick embossed bottom layer, before attaching everything to the card base, along with the beloved Subtle e/f I got to use at Michele's!!!  Love it -- wish I had caught wind of it while it was still for sale!  A few iridescent drops and my card was complete.  Again, no sentiment as I have quite a few "occasions" coming up.

Thanks, Michele, for your expertise!  And yes, Marcia, I finally got these posted!  Boy, a few sidetracks and I went all squirrely on you - I totally lost my intention in getting these posted sooner.

I'll enter these at The Flower Challenge #90 - Add Layers and Triple B - April 2024.


Supplies:
   Card #1 - SU Subtle e/f; Splb Labels 18; WF Tulips stamps & dies; PFS Glacier jewels
   Card #2 - Szx Bricked e/f; PFS Nested Arches fp & dies; SU Subtle; WF Tulips & dies; PFS clear drops

Thanks for the visit, and I hope you all have a great, crafty weekend ahead!

Hugs,
TK


4.16.2024

Masculine BD Card & a Round-about CASE

 Welcome, Welcome!

Today's card brings my SIL's Birthday, front and center!  Happy Birthday, Big D!
In making this card, I was looking for masculine inspiration and I went to Michele's blog to search.  What I found was her card CASE-ing me, so now I'm CASE-ing her!!!  It was such a long time ago, so I decided to bring the technique back and make another card ~


Using the same folder, however I also used different ink colors, a different label tag and a different sentiment.
So, what's CASEd from her card, you ask?


Why, off-setting the embossed texture on the second embossing so it doesn't mimic the actual inked portion!  Brilliant!  Thanks, Michele!  And my sentiment?  Well it's a new-to-me better press plate set, which didn't im-press at all!  I used all 3 given shims and nada; so now I'm going to have to research what I can add to my Big Shot Express (electric) to run my BetterPress through it and get that beloved impression.  I did try adding a detail metal shim but it was not as long as the "sandwich" so it quits rolling at some point....  Oy!  I may have to bring my manual Big Shot Plus out of the closet for just this purpose.

Anyway, that's it for me today, except sending it over to NBUS for that un-impressed sentiment!


Supplies:
   Darice - Argyle e/f
   EH (oob) - Hex Frames
   Splb - A Little Message sentiment bpp (NBUS)

It's a great start to the week, I hope your week is blessed too!

Hugs,
TK


4.11.2024

#pfcreateandconnect - Class 4 w/Yana Smakula

 Hello!

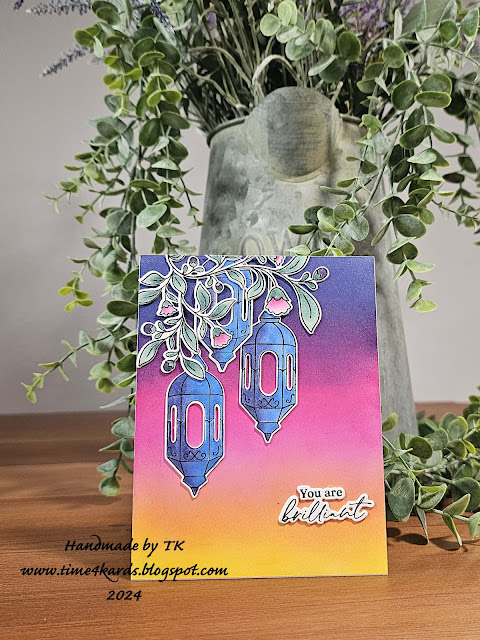
Today's post is another from the February event, that I've been so deliquent in posting!  I plan to do the remaining posts soon, so hopefully I'll get it all done.  Today's cards feature the PFS Lantern Botanicals, and boy, does Yana know how to use them (what am I saying, she is amazing with any product)!

Card #1 - 

Gorgeous, right?  I changed this up a bit, as I used the frame die to cut down the blue glitter background to leave some white showing, where Yana used a full glitter background.  This set is so gorgeous and is now available in a foil plate, which we didn't get in the event.

Card #2 - 

Another bold background!  While mine was not inked as heavily as Yana's, both are pretty -- I guess I'm just not as comfortable with bold as she is.  I didn't place my lanterns the best, in fact the middle one almost is hidden -- lesson learned...

I hope you've enjoyed these posts, as I only have a couple more unless I decide to do the "extra" make & takes to show.  Yana's class started out day 2 and I had learned that I need to blend ahead of time, if I wanted to stay up with the class, so I inked the evening before.  I also wish that I had left the die cut pieces in the full cardstock panel and the stamps in place, then I could re-ink the details after the blending.  Either way, these cards are beautiful, and that's understating Yana's talent!

Supplies:
   PFS Lantern Botanicals stamps, dies, stencils; Notched Corner die

Thank you for the visit and I hope you have a beautiful weekend ahead.

Hugs,
TK


4.08.2024

Treat Yourself!

 Hello again!

That sentiment is one that I did not treat lightly while recently in Michele's studio!  A gracious hostess and she never tired of me wanting to see and play with all the things.  Another fun product that she had was layering stencils for backgrounds -- wonderful idea, but I would've never considered them UNTIL ~

Thanks, Michele, for also showing me to take a photo of my colors!


Lucious, quick and easy -- this stencil is a treat!  Two colors!  Afterwards, I cut it down with two layers of dies and added a gold panel underneath for interest.  However, after popping up the center on foam and setting it on top, I couldn't see enough of that gold paper so I off-set the center layer so it could peek out!  This card will be my second entry to Color Hues #84 - Peach & Green.
Here's a better photo of the shine ~


This is an odd angle, but now you can see the shine a tad better.  A pre-foiled sentiment was attached.  What did I do with that outer portion, you ask?  Why, put it inside the card to allow for plenty of space for personal writing -- no waste here!
This is definitely a QACAS card, but also really pretty with the sweet stencil.


Supplies:
   WF - Layered Orchid stencil
   CP - Scallops & Dots dies
   PFS - Ephemera #6 pre-foiled sentiment

Loving these sweet tools from Michele, and loving the colors at Color Hues!
Thank you for the visit, and have a wonderful week!

Hugs,
TK


4.07.2024

Happy Days

 Welcome, welcome, Dear Friends!

Today's post is all about a certain Birthday boy!  Well it isn't quite his Birthday, but today is when the family celebration is happening, so I present his card ~


I started with my NBUS Postage Stamp Collage die and stencils.  I ink blended on all the panels with the same colors, light for the background and then darker for the fun stenciling.  I stayed with a light color for the UR and LL corners, then stamping his initial and age.  I also ink blended the portion of the panel that cuts off to reveal the outer postage marks, blending in a deep blue, then adhered it directly to my card front.  I popped up the postage base, and then popped up my adorable bear!  He's another fun item I brought home from Michele's and I knew I had to use him for this cardl, he's colored with Copics.

Because I have used a new product, this card will go to NBUS #61, and because my bear is so adorable, he'll be entered over at Double D - Cute Little Animals too!


Supplies:
   WF - Postage Stamp die & stencil
   CCC - Happy Days
   MCS (oob) - Chunky Alphabet

Thank you for the visit -- I hope your Sunday is happy and relaxing, just what the doctor ordered!  We had several days of warmth, getting up to 83 degrees, followed by several days of rain and/or drizzle in the 50's, and today's wind!  Temps are supposed to go back, I know I'm hoping they do but also hoping they stop in the 80's and just bypass those 100's this year!

Hugs,
TK


4.05.2024

There Is Always A Reason To Smile

 Hello and welcome!

I'm back again and refocused!  I'll be doing a few posts, well maybe a little more, of the items that I got to play with recently in Michele's fantastic studio.  Need I say more?  How can you go wrong in her studio?!

These two cards are from Alex Syberia and they were both hot foiled.

Card #1 ~


Foiled in black and colored with the matching stencils, using some glorious colors!  The tulips were placed on a banner, popped up with foam tape and then I added a sentiment provided by was gifted by Michele.  I'm sorry to say that I don't know where the sentiments are from, but they are wonderful!  Thanks again, Michele!  This card will go to Color Hues #84 - Peach & GreenFour Seasons - April/Anything Goes and The Flower Challenge #90 - Layers.

Card #2 ~


Foiled in gold, colored with stencils in more amazing colors, popped up on foam over the foiled frame and sentiment.


Supplies:
   Card #1 - Alex Syberia Tulip Treasures fp & die, PFS Slim Ornate Banner
   Card #2 - Alex Syberia Tulip Treasures fp & die, SB Glimmer Frame (L Willison) and Anytime Sentiment


Thank you for the visit!  I'll be posting more, as I played with a lot of fun products during my recent visit!

Hugs,
TK


3.30.2024

Cards with Ida

Hello!

Today's card is another challenge with Ida, this time from a photo that I chose.  Well actually, she found the photo and I was immediately drawn in and claimed it!
Here's the inspiration ~


Any guesses which way I went?  Jungle?  Cake?  Florals?
Here's my card ~


Colors!  The colors in that first cake won my heart!  I actually wasn't planning on an Easter card, but while going through some dies, I found this one and knew it would rock that glorious sunrise!
P.S.  If you're OCD and stuck on looking at that "thing" to the left of the Bible, just below the napkin, it's a FIBER not one of my grays - lol!  Go ahead -- zoom in, I promise!  Lol

I actually made two versions of this card, but I'm not sure it works.  Does the sentiment strung across the horizontal beam work?  I felt that it was symbolic, does the cross blended in too much?


Anyway, I hope all of you have a great weekend!  If you celebrate Easter, be blessed and enjoy!
Do stop by and see Ida's creation!  She'll love your visit too.

Supplies:
   PFS - leftover panel from Notched Corner die
   SSS - Outline Floral Cross
   CCC - We Are Healed

Hugs,
TK


3.27.2024

Easter Cards 2.0

Hello, Hello!

I'm back again with another couple of Easter cards for you.  Well, not actually for you but hopefully you know what I mean!  These were all made from the same sitting as before, just another post so I don't wear you out too badly.  By the way, these two cards are described by Hubbs as "the prettiest cards"!

Card #3 ~


Another leftover cover plate, a couple of foiled hexagons from an NBUS set of hexes, and the flutterbyes again.  I'm really into these things, I hope you're not getting bored!  Oh!  I must mention that while Hubbs wanted me to create all Easter cards alike due to my late-ness, I challenged myself to use the same basic pieces and change each card up a bit.  I hope I've succeeded!  

Card #4 ~


A foiled plate (both outer layer and inner), some more beautiful washi butterflies, all layered together with my Easter sentiment.  I'm pretty sure you can spy some of that foil shine!  This foil plate was a recent freebie, and I wasn't really too sure about it UNTIL I foiled it!  Wow, don't judge a book by anything other than the whole book - lol.  Now?  Not only do I believe it's beautiful, but it also makes for a great masculine card, am I right?

One of these cards will be sent to NBUS #60 for using my NBUS hexes OR for the first outing with the Gatsby frame, which will it be?  And about those hexes, I was neglectful for not getting the dies but I found them on Amazon - bingo!


Supplies:
   Card #3 - PFS Stitched Octagonal cover plate, Fluttering Butterflies washi; EH - Essential Octagons hfp (NBUS); CCC - We Are Healed
   Card #4 - PFS Gatsby Frame hfp (NBUS freebie with order), Fluttering Butterflies washi; CCC - We Are Healed

In case someone's asking, because someone who was a "no reply blogger" asked, CCC stands for -- Colorado Craft Company!

If you celebrate Easter, may you find all the blessings of the day!

Hugs,
TK

3.26.2024

Easter Cards 1.0

 Welcome!

Today I bring a couple of Easter cards -- they're in the mail and whisking across states to send Easter greetings to loves ones.

Card #1 ~


A quick card made literally from "leftovers" from the recent PFS Create & Connect.  The only thing I did was die cut more butterflies from the washi, glue all the layers together, stamp the new-to-me sentiment onto the smallest rectangle after inking most of the panel.  The butterflies were glued down in the centers and, presto, this card was done.  I will say that we had one overcast day and that, of course, was the day I was photographing!  So my base cardstock is actually a very light teal/blue and the inner panel was inked with a very light green, both of which match the butterflies MUCH better than it appears in my photo -- oy!

Card #2 ~


Made with a new-to-me background coverplate, an inked arched panel, and then a few more of the branches and butterflies from the same washi die cuts.  This sentiment is also new-to-me, from the same set as above.  Again, a bad day for photographing, so of course you can't see the gold in the washi!

With all these new products, one of the card will be entered into NBUS #60.


Supplies:
   Card #1 - PFS Notched Corner die, Fluttering butterflies; CCC - We Are Healed (NBUS)
   Card #2 - PFS - Stained Glass die (NBUS), Nested Arches die, Fluttering Butterflies; CCC - We Are Healed (NBUS)

Thank you for the visit -- you're awesome, and I hope your day is too!

Hugs,
TK


3.20.2024

Just a Hummer of a Note

 Hello, Everyone!

I hope your week is going swimmingly, and you've had plenty of craft time!  I'm here today to celebrate a Birthday this week!  It was a fun card to make, and I knew right off what I would make once I saw a few challenges!

Here's my card ~


I started with the sketch at FMS, tipped, but I missed that one, added a bird for JUGS #718 and a Time Out #259 challenge collab, then added the colors at Color Hues #83 - Blue & Cream and then added in a sweet magnolia bloom.  While my cream isn't exactly cream, it's the lightest that I had so I hope it works!  And, I didn't think magnolias were early bloomers, but I guess they can be in some places, April and May!

I used a new hummingbird die, a piece of champagne glitter cardstock, a leftover coverplate piece from a recent class and a new press-ed sentiment (actually I just got the whole tool - yay, me!).  I guess I'll enter this over at NBUS #60, too!


Supplies:
   SSS - Layered Hummingbird die (NBUS)
   MB - Magnolia Bloom die
   SB - Sunflower Border (sentiment only bpp) (NBUS)
   PFS - Stitched Octagons coverplate

That's it for me today!  Like hitting three challenges wasn't enough...  I do hope this card brings the recipient great joy, and wonderful Birthday wishes.

Hugs,
TK


3.19.2024

Playing Cards with Friends!

Good morning, Friends!

Remember I was recently blessed with going to Michigan, meeting and being hosted by Michele?  Well, I finally got a couple "makes" together from our playdate with Marcia!  We're posting them today, and I'd love it if you visited them too, I've provided the links below.

Our first card was provided by Marcia, stamped and a square card base, so this one will be entered at The Flower Challenge #89 - Square Card and Trible B for the butterflies ~


The wreath was stamped, then water colored with DIs and fussy cut so I could pop it up, over the embossed background.  While at Michele's, she gave me that adorable circular-cut sentiment, so I knew I had to use it too!

My next card was stamped, colored using the matching stencils, then die cut.  While at Michele's, we worked together to figure out her very obstinate foiling machine!  The connection is so harsh, that it literally took two of us to pull it apart, so then we worked to figure out the correct shim/no shim, pressure needed, embossing machine to use, until we had some successful foilings.  She was gracious to gift me a couple of backgrounds using foil plates I don't have, and this is one of them!  Now, Michele can foil away -- well as long as her Hubby is nearby!


Beautiful, right?  While Peonies aren't the first thing to bloom, they still remind me of the warm weather coming.  This card will head over to Four Seasons challenge - Spring.

Oh my, thanks to Michele and Marcia, we had an amazing day!  Many more things to come, but this is our post using the same main element!  Thanks for a great day, Ladies!
Now, I know you're curious about Michele's and Marcia's makes, so head on over, you'll be glad you did!

Supplies
   Card #1 - PB Winged Wreath in Broken China, Abandoned Coral, Twisted Citron and Iced Spruce; Alt - Wicker Texture
   Card #2 - Alt - Pristine Peonies (rats!  I forgot the colors!); PFS - Abstract Triangles hfp; SSS - Fancy Thanks

Thank you for the visit, I appreciate you!

Hugs,
TK

3.10.2024

Today is a Perfect Day

 Hello, Fine Feathered Friends!
No?
Okay - hello, FRIENDS!!!

I have returned from Michele's and am "live" again - lol.  I had a couple of pre-dated posts so that it didn't appear that I feel off the face of the earth -- like THAT never happens to me! Lol
Tonight, I'm going to make this rather fast as I have a few "chores" still to complete before it's back to work tomorrow, so I'll get right to it.

I saw a few posts where people were joining over at Color Throwdown #783 - Peach, Sage and Cream.  I knew immediately that I had to play along, since I made the perfect panel while away.
Here is my card ~


While in the rush to put this card together, I totally forgot the cream, had everything proudly mounted on white, then UH OH!  While taking the photo, I remembered that it was supposed to be cream, so off I went back to the craft room.  Fortunately, this layout made it easy to recut the elements out of the first card and remount on cream!  It saved the day!

I ink blended the panel using CP Bellini, Orange Peel, Garden Party and Lime Rickey.  The panel was cut down, placed on the embossed base card and the sentiment foam-mounted.  Using the remaining portion of the panel (since I cut using the top edge), I added the horseshoe-portion to the inside, to bring the colors inside, leaving just the right amount of room for a hand-written sentiment ~


Supplies:
   WF - Rose background stencil, Nested Dome dies
   Alt. - Organic Linen e/f
   Alex Syberia - Spring Garden (sentiment)


That's it for me so I can zip this over to the challenge before I run out of time!
Thanks for the visit!!

Hugs,
TK


#pfcreateand connect - Class 1 w/Anett Gelencser

 Good morning!

I have another set of cards from the recent Create & Connect event, and while there are some beautiful cards, these two just struck a chord with me!  Anett made some beautiful designs, and I made very little changes to them because I was so smitten.  Here's my renditions ~


A folding easel card with top opening, the butterflies all made with the washi tape!  I haven't really gotten onto this bandwagon, but it sure makes beautiful cards!  Anette used a second stacked sentiment for the prop of the easel, where I changed it out to gems and a butterfly inside too.  I didn't take a flat photo but I'm sure you can image it.


This beauty absolutely captivated my heart!  Believe it or not, it is a pop-up window box, covered by the smaller frame so it lies flat for mailing in the envelope.  The colors, the design, everything... - you get the point, I'm totally enamored!  This card has already found its home, as well.

I wish I had taken photos of the card types, but I actually took all photos between the classes on our "hour rest", which is when I was compelled to clean, reset for next class and get a glass of water or cup of coffee!  The classes were amazingly organized though we did experience a couple of technical issues, but still amazing and fun to feel like you're sitting and chatting with these card superstars!  I have to admit, even with doing the "homework", I still was busy during class and didn't do much chatting -- I can multi-task, but apparently not listen to instructions, and follow the instructions and chat too - lol.

Since these are an all-NEW suite of products, I'm sending one of these off to play with Darnell at NBUS #60 and to Triple B challenge.


Supplies:
   PFS - Fluttering Butterflies stamps/dies/stencils/washi (NBUS); Stitched Octagonal coverplate; Notched Corner frame dies


Well, now that I'm back at home from an amazing time with Michele, I better get to crackin' and get laundry and cleaning caught up before work tomorrow!  My sincerest thanks to Michele and her husband for an amazing adventure and memories!

YES -
being hosted at Michele's place, playing in her amazing studio with new-to-me toys, meeting such a great people (Yes, her husband is pretty awesome too), and also meeting Marcia -- don't you know this gal (ME) is Blessed!

Hugs,
TK