Showing posts with label Guest Designer. Show all posts

6.23.2023

JUGS #685

 Hello, Dear Friends!
I'm back again today for my final Guest Designing for Just Us Girls challenge.  It's been a great honor, pleasure and a whole lotta fun.  Here's today's challenge inspiration ~


It's a card that we all can use and frequently do.  Here's my card ~


OK -- all the kudos go to Hubbs for this idea!  I'm not sure why he threw this idea out there but I'm sure glad he did... so I ran with it and made another new card for today and will save the first for another day.

A hot foiled the sentiment, stamped the head image above, allowing space for the "idea bubble".  I couldn't find graduating circles or a thought bubble and was afraid to free-hand and mess up the rest, so I came up with the hearts since that is what was going to be inside the idea bubble anyway.  I'm tickled red with this, all thanks to Hubbs!  However now I need to purchase a thought bubble, graduating circles, and a speech bubble while I'm at it..... oy, more shopping!

I hope you've had a chance to join in this month and have had as much fun as I have.  If not, this'll be a great week to get another CAS card done!

Thank you, JUGs Ladies, for being brave enough to ask me to join you, plus all your sweet encouragement too.
P.S.  I'll be off-line for a couple of days but I can't wait to see what you've done when I get back!

Supplies:
   EH - Voices In My Head (NBUS)
   Various hearts - Inkadinkadoo and W&W
   Splb - More Glimmer Sentiments


Hugs,
TK

6.16.2023

JUGS #684 Photo/Moodboard

 Hello again!
It's week three for me guesting over at Just Us Girls Challenge, and I'm having a blast!  They have a creative photo for us today ~


What do you see?  Beaches, cabanas, changing huts, maybe even little shops...  Would you like to see what I see?  I think it'll shock most of you, but I guess it depends on how well you know me
(and Hubbs)!
Here it is, hang onto your seats ~


Yep!  I see a garage!  lol
You see, this'll be for Father's Day today (we're celebrating early) for Hubbs, and he's a motorhead (with a wife that tilts that way too).  Yes, we both ride motorcycles, love cars especially the classics and race cars, plus pretty much anything with an engine.  Hubbs has a huge shop and it's packed to the gills with toys!  This would be his motorcycle, a 2008 Harley in black and bronze, though his is larger with seats for two and hard bags for luggage.
So what do you think?  Did I hit the nail on the head for Hubbs?  I think so!  I'm so glad I got these new sets just in time.

I started with a base and embossed it with a bricks folder because our house and shop are part brick and siding.  I cut the "garage" base and added siding strips that I did a faux woodgrain on with gray ink and gray trim, then added a small, embossed panel for the garage door.  I stamped, colored and die cut all the elements and laid them out, popped up the oil can (you know Harleys - lol), plus hung up the adorable sign for fun!

Won't you join in our fun?
This photo could go so many ways, so have a go at it and join us this week at JUGS #684.

Supplies:
   HB - Dad's Garage, Take A Ride (both NBUS)
   Szx - Bricked e/f

Hugs,
TK

6.10.2023

JUGS #683 - Hello!

 Hello!  Again!

Today is my second stint as GD over at JUGS and I'm so thrilled to be included!  The challenge this week calls for "word".  Now this can be any word that you can utilize, but hello was given as a suggestion - my card today uses that suggestion.


I knew from the get-go which image I wanted to use, and I even knew what technique I wanted to use -- now that isn't normal for me, it takes me a bit of time, and by NO means am I ever fast!  I hope you see my hello!  Here's my card ~


Did you see it?  Here's a close-up ~


I think I've only done this technique once, but I sure enjoy it.  My image was stamped with a little lengthening of the stem and leaves added.  I then colored the hydrangeas with 3 colors of red and even a little yellow at the tips.  The piece was cut down, and then the letters were placed, cut and stacked 4 deep to add a bit of dimension, then glued back into the base.  The inner portion of the O was placed in flat against the complimentary layer of cardstock before attaching to my base card.  From there, a few marshmallow sequins were placed and it's done!

Now, won't you come join us for a bit of fun?  Please do join us.

Supplies:
   EbyE - Mondo Hydrangea
   PTI - Smooth Alpha (lg.) dies
   CP - Scallops & Dots die
   PFS - Diagonal Stitched Rectangle die

Another card, another day of fun!  I'd love to have you join us at Just Us Girls #683!

Hugs,
TK


6.03.2023

JUGS #682 - Color Week

 Hello and Welcome, Dear Friends!

Today's card and inspiration came from a great challenge, Just Us Girls and I've gracioiusly been asked to be the Guest Designer this month!  What a great honor and I hope I can make them proud, plus inspire you to join us in the fun.  This week's challenge is a Color Challenge ~


Don't you just love these colors?  Wow, I know I'm thrilled.  I used the same colorsbut went a tad lighter, it seemed to work a bit better on my card ~


I used a couple of new products in my "collection" and I'm sure glad I got them.  I stamped in VersaFine Clair Twilight onto a white panel.  Using only two shades of DI's, I did some ink blending through the matching stencils.  Since I only used one color for each element (flowers or leaves), it gave me a bit darker range for the second inking of each color, and I didn't haven't to fuss with finding matching colors.  After cutting the panel down with a die, I popped it up on a layer of foam over the mid-gray base cardstock.  Then I hot foiled a sentiment on matching cardstock with silver foil and layered it twice, so I didn't get too much dimension.
A close-up ~


Well now that was fun, wasn't it?  Creating is always a joy when you have great inspiration and products.  Won't you see what you have, and join us in the fun?

Supplies:
   PFS - Bougainvillea Print stamp & stencils, Fancy Script hot foil plate & die
   WF - Nesting Postage die


Thank you for the visit, and to JUGS for the invitation!  Have a great week and see you next Saturday!

Hugs,
TK


12.01.2022

NBUS - Christmas Poinsettias

 Hello and welcome!
If you're new, thanks for coming by and if you're an old friend, I'm thankful for you too!

I'm honored to say that I've been invited again to be the Guest Designer over at Darnell's terrific challenge, NBUS #45.  It's a challenge that we all need, because frankly we all have new stuff that's just itching to be used.  


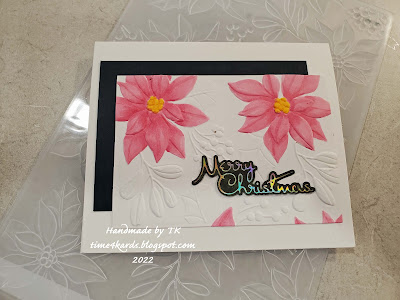
I've come today with a new 3D embossing folder.  What terrific texture and depth!  While I love all that beauty, I also challenged myself with a new-to-me technique of embossing, then coloring the embossed elements.  You've likely seen this around lately, and here's my card ~


Wow!  Love the dimension!  I colored the flowers with Copics but left the greenery white, to let the poinsettias shine.  I then hot foiled the sentiment, layered it up with dark green (tho it looks black) cardstock and adhered it.

This folder is actually so big that I was able to cut two smaller panels, and made a second card with a slightly different layout ~


How about you?  Are you inspired to dig out your NBUS products?  Join us!

Supplies:
   SB - Scenic Poinsettia folder (NBUS), Holiday Florals (sentiment), Aura glimmer foil

I hope to see your pretties in the gallery!

Hugs,
TK


4.10.2020

Twofer Challenge #26 - Rain/Umbrella

Today I have the glorious honor of being Guest Designer at Twofer Challenge!  I want to welcome you all, and hope your enjoy your visit!  Here's the prompt for this month ~


While the thought of what I was going to use as my "focal tool/image" was easy, my ideas flowed all over the place but I finally landed on these.  My first card took on the traditional use of the umbrella...


I used a recent sketch I'd seen which gave me a starting point for my design.  From there I did some water color smooshing using oxides thinned with shimmer mist, cut out the partial circle to give Mr Penguin a stage and added the puddle.  I stamped, colored and fussy cut the penguin then die cut the umbrella in layers, adding a pop of color.  I printed my own sentiment, half on the label and half inside since I didn't have what I wanted -- an encouragement.  Here's the inside ~


For my second card, I went a little untraditional with my umbrella!


I turned that umbrella upside down and made it into a flower basket.  With quite a few April/May Birthdays, I needed to make more and this one fits the bill.  I ink-blended the background, flicked water then finished with the stamped, die cut flowers which are slightly winked.  I then tucked the flowers into the umbrella bowl by cutting the handle off and placing it behind them.

Weird story -- we were given a water fountain that turned out to be HUGE and leaking...  so we decided to dismember the base, place the bowl down on the ground, and remove everything that went up from there (a little girl and boy playing).  Soon it will be a flower basket just like this one with flowers spilling out!  And thus my inspiration...

Now a little hindsight...  I went with blue backgrounds on both and wish I'd have done that a little differently, but since I had rain on the brain, I guess you'll have to give me a pass on that one - lol.


Supplies:
   Both - MFT Layered Umbrella
   Card #1 - MFT Penguins in Paradise, Sizzix Circle die
   Cars #2 - PTI Floral Wrap-Ups stamps/dies, CB - Beautiful Friend


I hope you enjoyed yourself, I've had fun on this challenge and receiving your generous visit!  Bless you all, come again and take care of yourselves - right?!

Hugs,
TK